Spring is coming, and with it countless ways to enjoy flowers in all their glory. Could this be the year you start a cutting garden? Farmer-florist Erin Benzakein points the way in a satisfyingly complete and richly illustrated guide, Floret Farm’s Cut Flower Garden, out this week.
Benzakein has turned what she’s learned from more than 10 years working on her Washington farm into a lush and accessible guide to growing, harvesting and arranging flowers. The techniques work whether you have a rambling backyard, an 8-by-8-foot raised bed or some pots on a patio.
Part one covers her process for designing and preparing a productive flower plot. She then dives into guides to each season, including garden tasks, profiles of her favorite flowers for cutting, vase-life tips and beautifully.
“There is something magical about experiencing an entire year through flowers,” writes Benzakein, shown here with a bucket of summer dahlias, including ‘Crichton Honey’ and ‘Snoho Doris’.
“Once you start growing your own cutting garden and working with seasonal flowers,” she says, “you’ll likely notice a powerful transformation in your awareness as you tune into the subtle, magical changes in nature.”
In the following excerpt from the book, Benzakein shows how to start your flower garden by seed.
Starting Seeds 101
From “Floret Farm’s Cut Flower Garden” (Chronicle Books, March 7, 2017; $29.95)by Erin Benzakein with Julie Chai. Photos by Michèle M. Waite
Starting your own seeds is a great way to get a jump on the season. It also gives you access to hundreds of specialty varieties that you won’t find at your local nursery and is the most affordable way to fill a cutting garden fast. You just need to keep a few key things in mind before you start.
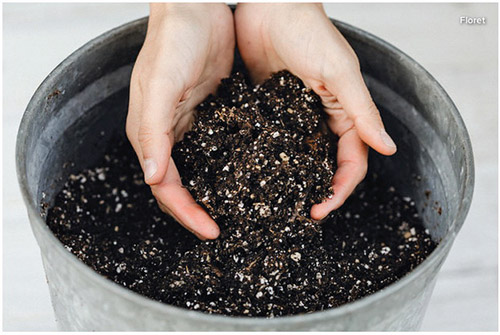
- Moisten your potting soil until it’s thoroughly damp, but not dripping wet.
- Fill seed flats or pots to the top with soil, tapping them firmly against the table as you go so that the soil settles in and there are no air pockets trapped in the tray cells or pots.
You can start seeds in just about anything that holds soil and drains water, including egg cartons, old pots and plastic cups with holes poked in the bottom.
If you’re reusing pots, be sure to wash them thoroughly with a 10 percent bleach-water solution to kill any lingering diseases or pathogens. But for the best results, I highly recommend recycled cell packs — the kind you see at garden centers holding four to six seedlings — from a local nursery, or new seed flats, which are basically shallow, perforated trays made specifically for growing seeds.
- Label the tray or pot with the name of the variety you plan to sow and the date planted.
- Refer to the seed packet for planting depth; a general rule of thumb is to plant the seed twice as deep as its longest side. Make a hole for the seed in each cell or pot using your finger, a pencil or a dibbler (a tool that makes holes for seed).
- Drop one or two seedsinto each hole.
- Add a light dusting of seed starting mix — or, for larger seeds, add about one-quarter inch (0.6 centimeter) of potting soil — over the surface, making sure to cover all of the seeds.
- Set freshly sown trays or pots in a plastic tub with an inch (2.5 centimeters) of water in the bottom, and let the trays soak up the water from below. Remove once the soil surface is evenly moist; don’t let trays or pots sit in water for more than an hour.
- Cover the trays or pots with a clear plastic dome and set on a 70°F (21°C) heat mat or in a warm corner of the house. Seeds will usually sprout before you need to water again, but check the soil for moistness after two to three days and bottom water again if it’s dry.
- Check the trays or pots daily. Once the seeds have sprouted, remove the plastic dome lids and move the trays or pots to a spot with bright light such a sunroom or greenhouse, or under fluorescent lights. The very first leaf or leaves that appear are called cotyledons; those that appear after are known as true leaves. Bottom water until true leaves appear.
- When the soil starts to become dry (which could be every day or two), water with a very gentle spray from a hose or watering can. As young plants grow, they need to be fed. Add a small amount of liquid seaweed and fish emulsion, following the label, to your watering can and drench plants weekly.
- When seedlings begin to outgrow their trays or pots, at about 2 inches (5 centimeters) tall, repot them into larger containers. Or, if the weather is warm enough (after all danger of frost has passed), begin transitioning them outside.
- Harden off young plants before putting them out in the garden, otherwise they will be shocked by the sudden change in temperature.
To do this, set trays or pots in a sheltered spot outside, increasing the amount of time they’re out there each day, starting with two to three hours, then increasing the time outside slowly over the course of a week or two, at which point seedlings can remain outside from then on. This helps the young plants acclimate to the more extreme temperature fluctuations found outdoors.
Know your last spring and first autumn frost dates. Before you go crazy sowing seeds in late winter and early spring, it’s important to know just how early you can start — if in doubt, ask your local Master Gardener group or staff at a trusted nursery for the expected last frost date. Fast-growing annuals that bloom in summer (those that take less than 90 days to harvest, such as cosmos, sunflowers and zinnias — the number of days to harvest is indicated on seed packets) shouldn’t be started more than four to six weeks before the last spring frost, otherwise they’ll get too big for their growing container and have soft, weak foliage and overgrown roots.
On the other hand, slow-growing plants like perennials can take a couple of weeks to germinate, so sow them indoors 10 to 12 weeks before the last spring frost date. Once you know your last frost date, check the back of each seed packet for days-to-harvest to figure out how many weeks early you can get them started indoors.
For the most part, if you want to sow successive crops after the weather has warmed in spring, you can plant until midsummer (or even early autumn in the mildest climates) in order to give them enough time to mature.
It works like this: If, for example, what you’re planting takes 60 days to mature, note your first autumn frost date, and count back 60 days. That would technically be the last date you could plant that crop for the season.
But know that as the days get colder and shorter, plant growth slows. So, to be on the safe side and ensure that I have enough time for crops to mature, I like to count back an extra month to be sure my plants will flower and I’ll have something to harvest.
By Sheila Schmitz, Houzz.com, Reprinted with permission from LinksNj.com